Unit Studies

Showing posts with label Fall. Show all posts

September 29, 2012

Native Americans Day 23: Native American: Homes

Native American: Homes
1. Review: Northwestern Native Americans lived in longhouses with totem poles. Plains Native Americans lived in teepees to move easily. Pueblo Native Americans lived in pueblos as a type of defense. Woodland Native Americans lived in longhouses with a palisaide around the village.
2. Map Skills: Look at a map of the U.S. And have the child point to each area, northwestern, plains, southwestern, and woodland. Have the child tell you something that they remember about that region.
3. Discuss: Talk about each region reviewing the tribes that lived in each region and what they lived in.
4. Read: The Very First Americans by Cara Ashrose or North American Indians by Marie and Douglas Gorsline

Native American Play
The boys played with the Indian houses that they had made throughout this unit study (except the igloo, the ants found it).  They used their Playmobil pirates to live in the houses.  The pueblo is definitely a favorite!
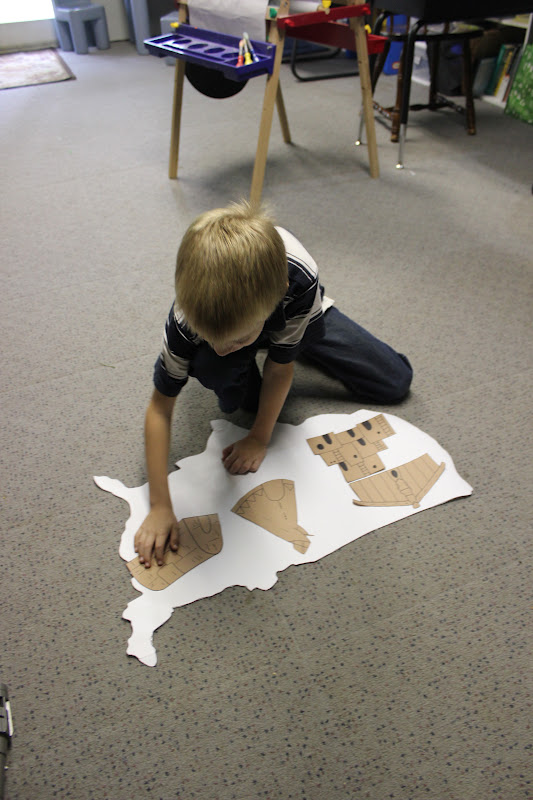
Native American Homes
Materials:
  • White Poster Board
  • Pencil
  • Sharpie
  • Scissors
  • Brown Construction Paper
  • Tape
Directions:
  1. Use the pencil to draw an outline of the U.S. Onto the poster board. Trace the pencil line with the sharpie.
  2. Cut out the U.S. Outline.
  3. Use the pencil to draw an outline of a Southwest pueblo, Plains teepee, Northwest lodge, and Woodland longhouse onto the brown paper.
  4. Use the sharpie to trace the outline and then cut them out.
  5. Have the child tape them in the proper spot on the U.S. Map and then use the sharpie to write the Native American region name.
Cahokia Mounds
 We visited Cahokia Mounds in IL.  We spent some time in the museum and then went out to climb Monks Mound.  We happened to be there for archeology day so the boys got to participate in some hands on activities.
 In the museum there were all kinds of old Indian items.
 There was a dig site set up for the boys to see what an archeologist does.
 The boys learned what raw materials the Indians used to make useful items.
 The coil pot method that we tried earlier in this unit study.
 There was an Indian village set up for the boys to walk through.
 An Indian catch the ring game.
 Another game like the basket game that we made earlier in the unit study.
 They got to feel different animal fur and see the skulls that went with each animal too.
 Sifting through actual rock, bone, and pottery that was found at the dig site.
Flintknapping, they tried to make an arrowhead but it took way too long to keep them interested.
 A girl showed them how to mix clay with water to make face paint.
 Then she painted J's face for him.
 He was loved having the face paint on and we even gave him an Indian name "Chief Talks-a-lot".
 Looking at some of the different plants from the area.
 Getting ready to climb Monks Mound.
 There it is!
 Up, and up, and up!
We made it to the top!

Native Americans Day 22: Northeast Woodland: Wampanoag

Northeast Woodland: Wampanoag
1. Review: We learned about the Shawnee tribe in the Northeast Woodland region last time. Today we will learn about another tribe in the Northeast Woodland, the Wampanoag tribe. Remind students where the Northeast Woodland region is on the regional map.
2. Map Skills: Compare the regional map to the globe or map today and see what countries or states are in the Northeast Woodland region.
3. Discuss: Fill out the Tribes Chart after reading each section. Have the child listen closely to choose what word to put on the chart. Bold type words are good suggestions.
  • Habitat: Northeast Woodland The Wampanoag Indians were original natives of Massachuetts and Rhode Island. Wampanoag people who befriended the pilgrims at Plymouth Rock and brought them corn and turkey for the famous first Thanksgiving.
  • Homes: A wetu is a domed hut, used by some north-eastern Native American tribes such as the Wampanoag. They provided temporary shelter for families wandering the wooded coast for hunting and fishing. They were made out of sticks of red cedar and grass.
  • Dress: Wampanoag women wore knee-length skirts. Wampanoag men wore breechcloth and leggins. Tthey would dress in deerskin robes during cool weather. The Wampanoags also wore moccasins on their feet. Usually they wore a beaded headband with a feather or two in it. A Wampanoag chief might wear a headdress made of feathers pointing straight up from a headbank. Wampanoag women had long hair, but a man would often wore his hair in the mohawk style or shave his head completely except for a scalplock (one long lock of hair on top of his head.) Wampanoag warriors also painted their faces, and sometimes decorated their bodies with tribal tatoos.
  • Food: Everyone in a Wampanoag family cooperated to gather food for the tribe. Women farmed corn, squash and beans. Men hunted for deer, turkeys, and small game and went fishing in their canoes. Wampanoag children collected other food like berries, nuts and herbs.
4. Read: Wampanoag by Barbara A. Gray-Kanaiiosh
5. Comprehension questions:
  • What region did the Wampanoag live in? Northeast Woodland
  • What kind of homes did the Wampanoag build? Wetu
  • What kind of clothes did the Wampanoag wear? Skirts, moccasins, breechcloth, leggins, headband, painted and mohawk
  • How did the Wampanoag get their food? Farmed, fished, and gathered

Birchbark Canoe
Discuss:
The Woodland tribes designed a canoe from birchbark. They designed a frame of wood or animal bones and covered it with birchbark with grew plentifully. The bark from a single large tree could cover a whole canoe. This created a much lighter weight boat.

Materials:
  • Brown construction paper or brown paper from a grocery bag
  • Crayons, tempera paint, or markers
  • Scissors
  • Yarn
  • Markers
  • A hole punch
Directions:
1. Fold the piece of construction paper in half the long way.
2. About a half-inch from the fold line, make another fold. Do this on both sides of the original fold. The paper should now look a bit like a capital "W." The folds will be the bottom of the canoe. 
3. Draw a canoe shape on the paper (make sure the folds are on the bottom of the canoe).
4. Cut out the canoe shape and punch a few holes on each end.
5. Using yarn, weave through the holes.
6. Draw decorations on the side.
7. Push the folded floor flat so that the canoe sits upright.
 
Indian Corn

Materials:
  • 1 cob of dried Indian Corn (We used the corn that we planted at the beginning of this unit study)
  • Glue
  • Copy of Corn on the Cob Pattern on cardstock (I found one in a Oct/Nov 2012 The Mailbox Yearbook)
  • Crepe paper
  • Crayons
Directions:
  1. The first thing you have to do is remove the kernels from the cob.
  2. Brake the cobs in half, then the kernels just had to be sort of pushed off one-by-one from the broken end. 
  3. Cut out the cardstock pattern of the corn and color it.
  4. Child will glue the kernels onto the corn cob pattern to make his own Indian corn.
  5. Use crepe paper to make the husk.

Bow and Arrow
Materials:
  • Sharp knife
  • Popsicle Stick
  • Dental Floss
  • Q-Tip
Directions:
  1. Cut 4 small notches on the popsicle stick 2 on either end.
  2. Soak the popsicle stick in water for over an hour.
  3. Tie floss around one end of the popsicle stick and wrap it a few times.
  4. Gently bend the popsicle stick and wrap and tie the floss on the other end making sure the floss is taut and on the same side of the popsicle stick on both ends.
  5. Cut off one end of the Q-tip. You might want to make a few arrows.
  6. U fine point pens to decorate the bow. (The boys loved having wars with Daddy with these little bows).

September 28, 2012

Native Americans Day 21: Northeast Woodland: Shawnee

Northeast Woodland: Shawnee
1. Review: We learned about the Iroquois tribe in the Northeast Woodland region last time. Today we will learn about another tribe in the Northeast Woodland, the Shawnees tribe. Remind students where the Northeast Woodland region is on the regional map.
2. Map Skills: Compare the regional map to the globe or map today and see what countries or states are in the Northeast Woodland region.
3. Discuss: Fill out the Tribes Chart after reading each section. Have the child listen closely to choose what word to put on the chart. Bold type words are good suggestions.
  • Habitat:  Northeast Woodland The original Shawnee home land was in Ohio, Kentuky, and Indiana. But the Shawnees were far-ranging people.
  • Homes: The Shawnee lived in small round dwellings called wikkums, or wigwams. Each Shawnee village also included a larger council house built from wood.
  • Dress: Shawnee women wore skirts with leggings. Shawnee men wore breechcloth and leggins. Both men and women often wore ponchos in cool weather. The Shawnees wore moccasins on their feet. As they migrated from place to place, the Shawnees adopted clothing styles from many other Indian tribes and from white settlers as well. Sometimes they wore a beaded headband with a feather or two in it. Shawnee people usually wore their hair long, though Shawnee warriors sometimes shaved their heads in the mohawk style. Many Shawnees painted designs onto their faces, and some wore tribal tatoos .
  • Food: The Shawnees were farming people. Shawnee women planted and harvested corn and squash. Shawnee men hunted in the forest for deer, turkeys, and small game and went fishing in the rivers and lakes. Shawnee Indian food included soup, cornbread, and stews.
4. Read: Shawnee by Barbara A. Gray-Kanatiiosh
5. Comprehension questions:
  • What region did the Shawnee live in? Northeast Woodland
  • What kind of homes did the Shawnee build? Wigwams
  • What kind of clothes did the Shawnee wear? Breechcloth, leggins, skirts, ponchos, moccasins, mohawk, painted and headband
  • How did the Shawnee get their food? Hunted and farmed
Native American Animal Races
We used page 61 of Native Americans Thematic Unit by Leigh Hoven to do a few animal walks.
First J walked like a bear.
  Then he walked like a crab and then a frog.
 
Native American Similes
Introduce students to similes (using like or as to compare two objects).

Give examples such as “fast as a cheetah” or “shy as a turtle.”

Explain to students that Native Americans sometimes had names that described who they were or what they did by comparing themselves to something in nature—for example, “Fast as a Cheetah” or “Wise As an Owl.”

Encourage students to think of three adjectives to describe themselves.

Have them write these words the board.

Next to each adjective, have students list something in nature that matches their word—for example, tall/tree or pretty/parrot.

Copy the following sentence frames on the chalkboard: ______ like a/an ______, and _____ as a/an _______
 
Headbands
Materials:
  • Heavy paper (tagboard)
  • Construction paper in various colors
  • Markers
  • Scissors
  • Stapler or tape
Directions:
  1. Decorate your headband with markers using geometrical shapes.
  2. Cut feathers from paper and staple them to the headband.
  3. Staple or tape the ends of the band together to fir your head.

Native Americans Day 20: Northeast Woodland: Iroquois

Northeast Woodland: Iroquois
1. Review: We talked about the Seminoles tribe in the Southeast region last time. Today we will move to the Northeast Woodland region (show on regional map) and learn about the Iroquois tribe.
2. Map Skills: Compare the regional map to the globe or map today and see what countries or states are in the Northeast Woodland region.
3. Discuss: Fill out the Tribes Chart after reading each section. Have the child listen closely to choose what word to put on the chart. Bold type words are good suggestions. After the chart has been filled out let the child color the Northeast Woodlands region on the blank Native American Groups Map.
  • Habitat: Northeast Woodland The Iroquois Indians lived in what is now New York State along the St. Lawrence River. The Iroquois Indians were know as the "Five Nations". The league was formed before European contact. The original five nations are Cayuga, Mohawk, Oneida, Onondaga, and Seneca. The Tuscarora joined later, after European contact, and became the sixth nation.
  • Homes: The Iroquois village consisted of two or more longhouses. Around the village great wooden palisades with watch towers were built. The longhouse was large enough to hold a family of 30 to 60 people. It could be 25 to 150 feet long. The longhouse was built by driving two rows of poles into the ground in zigzag lines ten or twelve feet apart. The poles were tied together a the top. Other poles were fastened across them. Next slabs of bark were tied to cover the poles. An open space was left at the top for smoke to escape. A door was built at the end of the long house. The door was covered with a curtain made from animal skins. Inside the longhouse a wide path ran though the center. Each family had a space about six by nine feet for a personal area. The family space was separated from the rest on the longhouse by leather curtains.
  • Dress: The Iroquois made most of their clothing from deerskin. The women wore skirts, vests, and moccasins. They decorated their clothes with porcupine quills, shell beads, and dyed hair. The women also made necklaces of shell beads and animal teeth. The women in the northern areas wore leggings and breechcloths. In the winter they wore rabbit fur capes or shawls tied over the left shoulder. The Iroquois men wore deerskin breechcloths during the hot summer. In the cold weather they wore leather leggings and tunics. The men wore moccasins made of leather or corn husks.
  • Food: The Iroquois men hunted deer and other game. Boys were allowed to join the men in hunting after they had killed a deer by themselves. Farming determined the way the Indians lived. The Iroquois moved to new locations when their large fields no longer produced a good crop of beans, corn, and squash. They called beans, squash, and corn.
4. Read: The Iroquois by Rachel A. Koestler-Grack
5. Comprehension questions:
  • What region did the Iroquois live in? Northeast Woodland
  • What kind of homes did the Iroquois build? Longhouses
  • What kind of clothes did the Iroquois wear? Deerskin, skirts, tunics, vests, capes, shawls, breechcloths, leggins and moccasins
  • How did the Iroquois get their food? Hunted and farmed

Bowl Game
Discuss:
The Iroquois Indians played the Sacred Bowl Game during the last day of the "Ceremonial of Midwinter" which marked the end of the year. The wooden bowl was decorated with four clan symbols - the bear, wolf, turtle, and deer. To play the game a player placed the six nuts which were colored on one side inside the bowl and hit the bowl against the ground. If five of the six nuts turned up the same color, the player scored and took another turn. The first player to reach 10 points wins the game.

Directions:
1.  Cut a circle from wood grain contact paper to fit inside a basket paper plate holder. 
2.  Use black markers to decorate the circle with different animals.
3.  Peel the paper backing from the contact paper and place the circle into the holder.
4.  Gather six flat dry beans. Have students color one side of the beans with the black marker.

Iroquois Tree of Peace
Discuss:
The Iroquois Confederacy is a group made up of six different nations of Native Americans, including Mohawk, Oneida, Onondaga, Cayuga, Seneca, and Tuscarora. Before the Iroquois became a confederacy in the middle of the 1500s, the different Northeastern nations often fought among themselves. Eventually they agreed to peace consisting of justice, sharing, and equality of life; it became their law. When the Iroquois nations agreed to live in peace, they buried their weapons beneath the Tree of Peace. The Iroquois Tree of peace is a whie pine tree. Your Tree of Peace will be a symbol of all the things that you can do in your life to live in peace with the people around you.

Materials:
  • Tree Branch
  • ruler
  • scissors
  • 2 sheets of construction paper
  • empty soda bottle (cut off the top)
  • tape
  • stone
  • pencil
  • hole punch
  • yarn
Directions:
  1. Find a branch that has fallen from a tree. The branch should measure about 2 feet long and have at least 4 limbs.
  2. Cut a piece of construction paper to fit the soda bottle and secure the paper to the can with tape.
  3. Place the end of the tree branch in the empty soda bottle. While holding the branch, fill the bottle three-fourths full with the stones. The stones help your branch stand up.
  4. Cut the second piece of construction paper into four equal parts.
  5. On each piece of paper, write a peace message or draw a picture that you can live each day. Here are a few ideas: “I will accept people the way they are” , “I will be kind to everyone”, “I will treat people the way I want to be treated.”
  6. Punch a hole in the top of each paper.
  7. Cut 4 pieces of yarn, each about 8 inches long. Slip yarn strand through each hole on the messages. Tie the ends of each yarn strand in a knot, and hang each message on a different tree branch.