Mesoamerica:
Aztec
1.
Review:
We learned about the Maya tribe in Mesoamerica last time. Today we
will learn about another tribe in Mesoamerica, the Aztec tribe.
Remind students where Mesoamerica is on the regional map.
2.
Map
Skills:
Compare the regional map to the globe or map today and see what
countries or states are in the Mesoamerica region.
3.
Discuss:
Fill out the Tribes Chart after reading each section. Have the child
listen closely to choose what word to put on the chart. Bold type
words are good suggestions.
- Habitat: Mesoamerica The Aztecs established an empire that consisted of most of Mexico today. They setup a strong, central government, and received tribute payments from many of their peoples.
- Homes: Homes of the farmers and other commoners were huts with thatched roofs. They might have mats on the floor and woven trunks to hold belongings. Every home had a garden of their own, including farmers. Homes of the nobles and wealthy were made of sun-dried brick. If you were very wealthy, your home could be made of stone. All homes were whitewashed to make them look clean and shiny.
- Dress: Ancient Aztec clothing was generally loose fitting and did not completely cover the body. Aztec clothes were generally made of cotton (which was imported) or ayate fiber, made from the Maguey Cactus (the American Aloe). Women would weave the fibers into clothing. Because of their vast trading network, the Aztecs were able to make use of a beautiful array of dyes, creating the brilliant colors still seen in Mexico today. People in the upper class wore clothing decorated with feathers and embroidery to show their status. They also carried fans made of feathers. It was against the law for commoners to wear feathers. It was against the law for commoners to carry fans.
- Food: Most people in the Aztec world were farmers. Farmers were taught how to be good farmers in the Aztec schools. Farmers were in charge of building the floating gardens. Fisherman fished. Hunters hunted.
4. Read:
pages 1-33 in The Aztec Empire
by Sunita Apte
5.
Comprehension
questions:
- What region did the Aztec live in? Mesoamerica
- What kind of homes did the Aztec build? Huts
- What kind of clothes did the Aztec wear? Cotton, feathers and fans
- How did the Aztec get their food? Hunted, fished, and farmed
Aztec
Calendar Stone
Discuss: There are two Aztec
calendars. One divides the year into 365 days. This helps
farm workers know exactly when to plant each crop. The other calendar
divides the year into 260 days. Priests keep track of this calendar
for planning religious ceremonies and festivals. The huge calendar
stone in the Great Temple is twelve feet in diameter and weighs 24
tons.
Materials:
- 1 ½ cups flour
- ¾ cups warm water
- ½ cup salt
- mixing bowl and spoon
- scrap of paper and pencil
- rolling pin
- cutting board
- cookie sheet
- plastic knife, craft stick, or toothpick
- tempera paints; red, blue, yellow, gold
- paint brushes
- acrylic varnish
Directions:
- Pour ½ cup of salt into the bowl and add the water, stirring steadily until the salt is dissolved.

- Slowly stir in the flour, then mix with your hands until the salt dough is formed. Keep shaping it until it's smooth and firm. From it into a ball.

- On a piece of scrap paper, draw a design for you calendar stone; divide the circle into 12 months.
- Preheat the oven to 250 degrees.
- With a rolling pin, roll out a piece of the dough large enough to make a circle about 4 inches in diameter and about ½ inch thick. Use a glass or other round object to press into the dough to make the circle.

- Move the circle onto the cookie sheet. Use pieces of the dough to shape features, such as sun rays, eyes, mouth, ears, etc. Attach pieces by pressing them into the dough. Wet your fingers and smooth over the seams. Use a plastic knife to make shapes. Make a small hole at the top for hanging.


- Bake for about 50 minutes or until the salt dough is golden brown. Allow it to cool.
- When cool, paint your calendar stone with bright tempera colors. When the paint is dry, spray the sont with acrylic varnish to preserve it.


Make
a Chinampa (Floating Garden)
Discuss:
To build the chinampas, plots about 30m by 2.5m were staked out on
the lake bed. A fence was woven between the stakes, and the area
would be filled in with mud and vegetation. The next rectangle would
be parallel to the first one, with room for a canal in between, where
canoes could pass through. These canals of course offered irrigation,
and provided food of their own such as fish and water fowl. Often
willows would be planted along the edge of the plot, to provide
further stable fencing as well as shade. In
the end, the garden plot would be no more than a few feet above the
level of the lake. They were supported with the Aztec's complex
irrigation and waterway systems, which included dams, aqueducts and
gates.
Ask
the students what things they think plants need to grow? What happens
if they get too much ______? Not enough _________? Based on student
answers, explain how Aztecs overcame these challenges when developing "Chinampas" to grow their food.

Materials:
- Empty pie tin or oven roaster (we used our turtle sand box, you could also use a child's swimming pool)
- Water
- Rocks
- Potting soil or dirt
- Seeds (maize, tomato, peppers, or beans)
Directions:
1. We poured water into the sand box.

2.
Then use the rocks to form the boundary of their Chinampa.

3.
Put the potting soil inside the rock formation (the rocks should
keep the soil from spilling into the water).

4.
Plant the seeds (we used maiz) according to directions in the Chinampa and place in
sunlight.


5.
Observe the Chinampa everyday, record your observations in a
journal. You can also draw a picture of your chinampa every few
days.


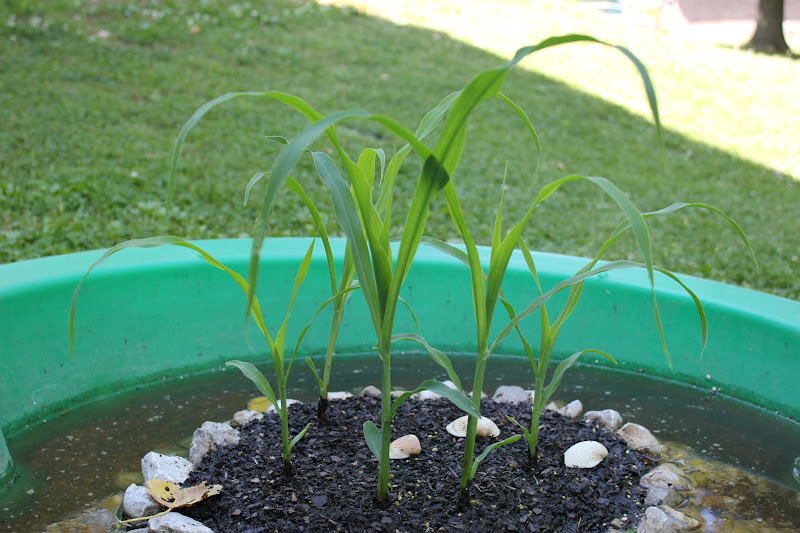
Bigger...
6.
Transfer the plants to an outdoor garden when
they get too big for the sand box.


7.
Continue
to care for the "crops" and keep daily records of growth,
rain, sunlight, and observations about pests.


And ready to pick!
Aztec Ofrenda
Discuss:
The Aztec women made
pictures using brightly colored yarn. They are called ofrendas,
which means “gifts” or “offerings.” They would cover a thin
board with beeswax and let the sun soften the wax. Then they could
press the yarn into the wax.
Materials:
- Newspaper
- poster board or stiff cardboard
- ruler
- pencil
- scissors
- brightly colored yarn
- glue
- tape
Directions:
- Spread a few sheets of newspaper on your work surface, and place your poster board on it.
- Measure a rectangle on the board 6”x8”. Cut out the rectangle.
- Draw the outline of your picture on the board (animal, plant, or abstract design) Keep it simple.

- Place a thin line of glue on the outline then place a single strand of yarn over it. Gently press it into the glue

- Continue gluing a single strand all the way around the outline. Change colors any time you wish, starting a new strand where the previous one ends.

- Fill in the figure completely with strands of yarn, applying a little glue at at time. Work form the outside toward the center, keeping the strands as close together as possible so that there is almost no bare space showing. Use little scraps of yarn to fill in the bare spaces.
- Fill in the background of the picture the same way.
 T wanted to make one too!


No comments:
Post a Comment