White
Read:
Winter
White by Christianne C. Jones
The
Little White Owl by Tracey
Corderoy
Song:
SING
FOR WHITE
Tune: “Jingle Bells”
Tune: “Jingle Bells”
Sing
for white, sing for white,
Let’s all sing for white.
Sing for eggs and sing for clouds,
Sing for snow so bright.
Let’s all sing for white.
Sing for eggs and sing for clouds,
Sing for snow so bright.
Sing
for milk, sing for chalk,
Sing for cotton, too.
And sing for little polar bears,
That live down at the zoo.
--Elizabeth Scofield
Sing for cotton, too.
And sing for little polar bears,
That live down at the zoo.
--Elizabeth Scofield
Color
Recognition:
Show the child 3 different colored cars (include white). Have the child point
to the white car.
Discuss:
What is something white? Baseball,
daisy, sheep, etc...
Snack:
White
Chocolate Pudding, Popcorn, Coconut


White Breakfast
Powdered Donuts, Vanilla Yogurt, Milk

White Lunch
Cottage Cheese, Cheese Sticks, Qusedilla, Marshmallows, Hard Boiled Egg

Powdered Donuts, Vanilla Yogurt, Milk

Clean
White Teeth
Materials:
- White Paper
- Toothbrush
- White Paint
- Scissors
Directions:
- Cut out a large tooth shape from the white paper.
- Let the child paint the tooth white with a toothbrush.
- Show them how to brush up and down, back and forth, and in a circular motion.


Sing: BRUSH, BRUSH, BRUSH YOUR
TEETH
(tune of Row, Row, Row
your Boat)
Brush, brush, brush your
teeth
Till they're clean and
white
Brush them, brush them
Brush them, brush them
Morning, noon, and night.
Cotton
Ball Clouds
Materials:
- Blue construction paper
- Scissors
- Cotton Balls
- Glue
Directions:
- Cut the blue paper in the shape of a cloud.
- Let child glue cotton balls onto the cloud.


White
Lapbook
Materials:
- 1 File Folder
- 5 White Construction Paper
- 5 Printing Paper
- Black cut out letters or stickers for "WHITE" (I used my cricut to cut them)
- 1 Black Sharpie
- White crayons
- White paint
- 1 Paint brush
- White Chalk
- 20 White Stickers (stars, circles, or any other white stickers that you may have)
- White colored pencils
- White play dough
- White dough tools (just a few)
- 8"x10" Balloon pattern from cardstock
- 4"x5" Balloon pattern from cardstock
- 1 Scissors
- 1 White balloon ribbon 3 feet long
- 4 White balloon ribbon 4" long
- 1 Wall clown 4 feet long (I made mine on posterboard)
- Glue bottle
- Glue stick
- White glitter or white sequence
- 1 White felt 4"x5"
- Hot glue gun
- 5 White yarn 1" each
- 5 White ribbons 1" each
- 5 White pom-poms
- 6 White buttons
Procedure: Today I decided to just do one part of the lapbook at a time instead of setting up the 6 stations at the table. This way we didn't have to do it all at once.
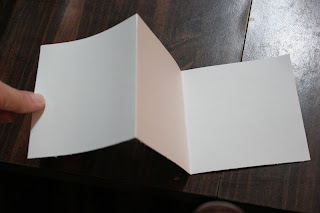
- Open file folder and twice fold (fold one end toward the middle crease then fold the other end toward the middle crease) in the sides so you can open the folder in the middle with the two doors on each side.

- Glue 1 piece of white construction paper in the middle.
- Cut the 2 white pieces of construction paper in half long-wise.
- Glue one half on each side of the open lapbook and on each side of the closed lapbook.
- Let the child complete the following activities: coloring (white printing paper with a 3"x3" baseball drawn in the corner, white crayons), painting (white construction paper, paint brush, white paint), markers (white printing paper with a 3"x3" daisy drawn in the corner, white chalk), stickers (white printing paper, white sticker), colored pencils (white printing paper with a 3"x3" sheep drawn in the corner, white colored pencils), play dough ( white play dough, play dough tools).
- Let your child start with painting (so it will dry on time) and work on other activities ending with play dough (so you will have time to cut while he plays). Child should fill as much of each paper as possible with white (the picture and the blank space).Crayons

Chalk
 Stickers
 - While child is playing with play dough; mom will cut a 3.5"x3.5" square around each colored picture (baseball, daisy, and sheep). Save the rest of the paper for the balloons.
- Cut a piece of the white construction paper in half long-wise. Fold it in a tri-fold accordion style. Glue the 3 pink pictures on the 3 sections (all pictures should be one the same side of the opened paper). Glue the back of the bottom third of the paper to the bottom right of the lapbook.
- Mom will trace and cut a 4"x5" balloon shape with the cardstock pattern out of the crayon paper, chalk paper, stickers paper, and colored pencil paper (be sure to save the scraps). Then cut an 8"x10" balloon shape with the cardstock pattern out of the painted paper (be sure to save the scraps).
- Tie the 3 foot balloon ribbon to the painted balloon and hang it on the wall with the ribbon in the clowns hand. (you can write "white" on the balloon before you hang it if you would like)

- Tie the 4" balloon ribbons to each of the crayon, chalk, sticker, and colored pencil balloons. Glue them in the center of the lapbook being sure to glue the top part of each ribbon too. You can tie all the ribbons together or leave them hanging.


- Child will cut the scraps that were saved into 2" pieces (the shape doesn't matter).
- Cut 1 piece of white printing paper in half so you have an 8"x4" piece. Fold it long-wise so it measure 4"x4".
- Child will glue his paper scraps on the front of the folded paper and on both sides of the inside to form an white collage. Let it dry.
- While the collage drys take the other half of the white construction paper that was cut in half long-wise earlier. Cut it down to 8"x4". Twice fold in the sides like the lapbook is folded (so you have kind of doors on the front).
- Open it up and write "WHITE" as big as you can with glue bottle. Let your child add white glitter or white sequence to the letters. Let it dry.

- While glitter is drying go back to the purple collage and open it up. Let the child glue in the black "WHITE" letters. Let it dry.

- While paper collage is drying work on the sensory collage.
- Warm up the hot glue gun. Take the pink felt piece. Have the child show you were he want's the yarn, ribbon, pom-poms, and 5 of the buttons. Mom will hot glue them on.
- Then glue the felt sensory collage to the top right of the lapbook.

- Go back to the glitter book and close both sides of the front cover. With the hot glue gun glue the extra white button on the middle of the front being sure to just put glue on one of the flaps. Glue the glitter book to the top left of the lapbook.
- Go back to the white paper collage and glue it to the bottom left of the lapbook.


Cottage Cheese, Cheese Sticks, Qusedilla, Marshmallows, Hard Boiled Egg

No comments:
Post a Comment